Welcome to the bigboi Knowledge Base
Your Source for Expert Advice, Troubleshooting, and Product Information
-
WashR PRO
- The WashR PRO has a oil leak
- The WashR PRO motor does not start when switched on
- The WashR PRO When I switch on the unit, the motor hums but does not run
- Wash PRO TSS Version only. The motor starts even with gun trigger is released
- WashR PRO TSS Version only. No water delivery when gun trigger is depressed
- How to Adjust your Spray Pressure on the WashR PRO
- How to maintain your WashR PRO
- How to store your WashR PRO
- The WashR PRO is experiencing a water leak
- The WashR PRO pressure drops during use
- The WashR PRO Pressure fluctuates
- The WashR PRO pump is noisy
- The WashR PRO pump is running but does not reach the working pressure
- There is the presence of water in oil on the WashR PRO
- How to check your oil level before use?
- How to Setup the WashR PRO
- How to Start your WashR PRO
- How to Stop Your WashR PRO
- How to use your Nozzles with WashR PRO
- WashR PRO Manual
- The WashR FLO Motor refuses to start
- WashR FLO Does not reach high enough pressure
- WashR FLO Motor starts up but there is no working pressure
- WashR FLO motor stops
- WashR FLO No detergent present
- WashR FLO Output pressure varies high and low
- WashR FLO Spray wand is leaking
- How to Set Up the WashR FLO
- How to Turn On and Off Your WashR FLO
- WashR FLO Maintenance Guide
- WashR FLO Manual
-
SuckR PRO
- WashR FLO pump is very noisy
- WashR FLO Water is leaking from the pump
- Storage and Transportation of the SuckR PRO
- Why Is My Engine Housing Overheating?
- Why Is the Suction Weakening?
- How to Assemble the SuckR PRO
- How to Service the SuckR PRO
- How to Use the Extraction Function (Kit Sold Separately)
- How to Use the SuckR PRO Vacuum Function (Wet & Dry)
- SuckR PRO Manual
How to Setup the WashR PRO
Table of Contents
Setting up your Bigboi WASHR PRO is straightforward. Follow these steps to ensure your pressure washer is ready for use:
Step 1: Refer to Adding Oil to the Triplex Pump
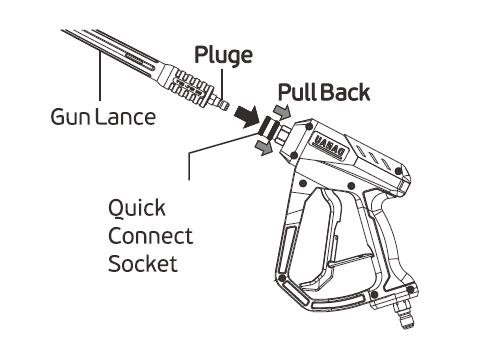
Step 2: Connecting Spray Wand to Spray Gun
- Pull back the slip ring on the quick-connect socket on the pressure gun.
- Insert the quick-connect plug on the gun lance into the socket.
- Release the slip ring on the female quick-connect socket and twist. Listen for a CLICK to ensure both quick-connects are coupled.
- Pull the lance and gun in opposite directions to ensure they do not separate.
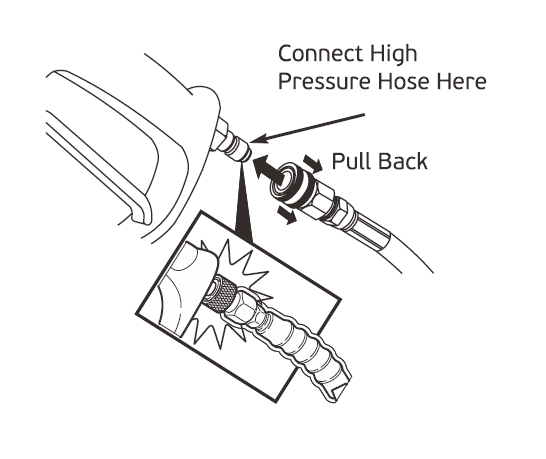
Step 3: Attaching High-Pressure Hose to Spray Gun
- Attach the quick-connect socket end of the pressure hose onto the pressure gun. Pull on the hose to ensure a tight connection.
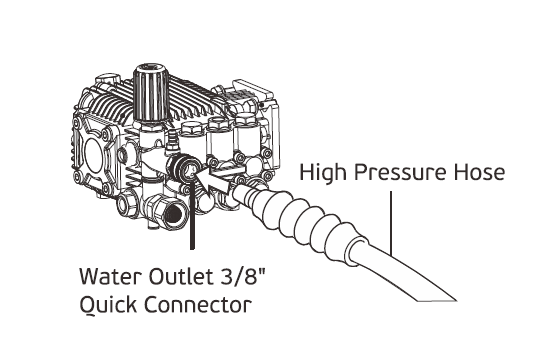
Step 4: Connect Hose and Water Supply to Pump
- Attach the other end of the high-pressure hose to the high-pressure outlet on the pump. Pull down on the collar of the quick connect, slide it onto the pump, and let go of the collar. Pull on the hose to ensure a tight connection.
- Before connecting the garden hose to the water inlet, inspect the inlet screen. Clean the screen if it contains debris or replace it if damaged. DO NOT run the pressure washer if the inlet screen is damaged.
- Run water through your garden hose for 30 seconds to clean out any debris.
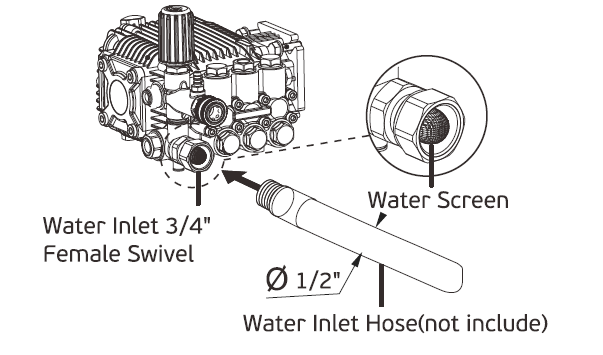
IMPORTANT: DO NOT siphon standing water for the water supply. Use ONLY cold water (less than 104°F/40°C). 4. Connect the garden hose (not to exceed 50 feet in length and with an ID no less than 1/2") to the water inlet. Tighten by hand. 5. Turn ON the water, squeeze the trigger to purge the pump of air and impurities.
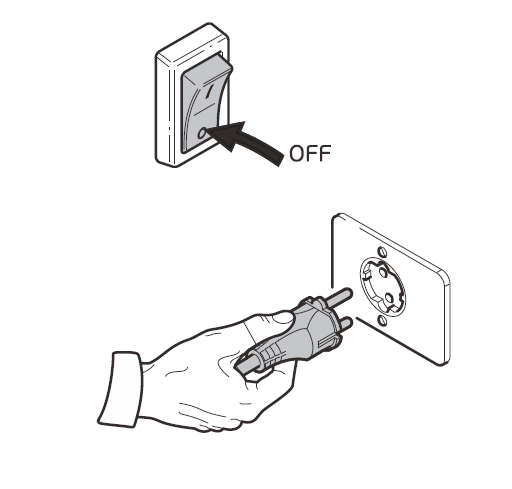
Step 5: Connect the Electric Supply
- Push the switch to the "OFF" position.
- Connect the power cord to the socket on the main power source. Extension cords are not recommended.
Step 6: Using Extension Cords
If extension cords are used, ensure they feature IPX5 protection level. The cross-section of the extension cable should be proportionate to its length. The longer the cord, the greater its cross-section should be. Using extension cords that are too long can cause a voltage drop, resulting in the motor running slower and potentially causing damage. Using extension cords with a smaller than recommended wire gauge can overheat, melt, and/or cause fires.

By following these steps, you ensure your WASHR PRO is set up correctly and safely. If you encounter any issues, refer to our troubleshooting guide or contact our support team for assistance.
Updated on 24 Jun 2024
What are your Feelings?
Thanks for your feedback
- Choosing a selection results in a full page refresh.

